Hello All,
It has been way too long since we have posted here. I promise that Scott and I will try and give you more content.
But we now have a real forum where you can discuss anything you want regarding Post Production. Enjoy.
Take care,
Justin Bourret
Tuesday, November 16, 2010
Sunday, November 23, 2008
Turnover bins

I was having a problem getting a change list of 2 of our sequences, so I sent a bin to a fellow assistant editor who started raving about something that I thought made sense and helps me, but apparently, it was pretty exciting in a postproduction kind of way, so I thought it worth sharing:
I have structured my turnover bins so that they contain all of the information that I need and provide a straightforward template for turnover and changes. The size / complexity of the sequences dictates how many versions of each I can have in a bin, but once they have exceeded reasonable bin size, I just start a new bin and continue the series.
I know that some people keep each turnover version in their own bins, but I like to have an immediate overview and by keeping multiple versions, I can see the progression of who has what, lengths, notes etc... at a glance
As you can see, I fill in the information that pertains to that particular turnover. Not all turnovers require 30 frame TC, so I don't necessarily fill that in unless needed. Same for TC24. If your tracking requires frame countes for DI, add a column.
I have separate columns for MX and Composer because on some projects, we have a temp Mx editor who may or may not work in concert with the final composer and they can be working separate versions.
I added a sort column into the cutting bins, so that I can easily sort bins with a reverse sort function. That way I can also easily track back to which version in the editor's bins were turned over.
-Scott
Monday, October 20, 2008
Forums
We have added a forum to Post Production Standards. Now you have the ability to ask questions as well as post your own special tips. Enjoy.
Wednesday, June 18, 2008
Copying Media Files - Unity
Sorry for the long hiatus everyone. Work, work, work, work...you know the drill.
Just getting through dailies on a show and was told about an interesting bug when copying over media files into your Unity. Basically, if you copy your media to one of your Unity partitions, make sure you keep the user folder that Unity has with in the OMFI MediaFiles folder closed when you copy them over. If you open the Unity User folder (ex. ZJustin), and do the copying, you run the risk of a file of the media files becoming corrupted...making you have to do the process all over again.
So do yourself a favor and keep the user folder closed as shown below. Makes the dailies process a little less annoying.
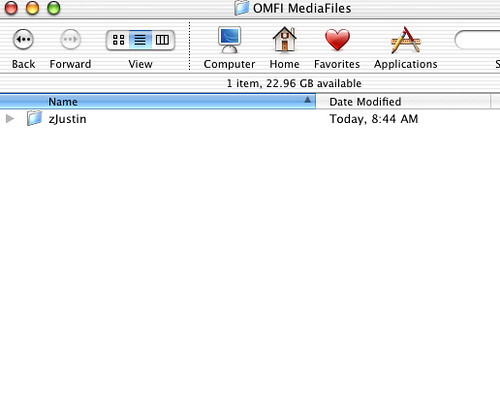
Friday, January 18, 2008
Avid data entry tip
Are you sick and tired of Cmd-V, pasting your way down a entire bin of takes where you want the same information applied to all the takes you have selected? I.E. date shot. Of course you could export the bin, open it in a spreadsheet and do a fill down command, re-import the bin, but who wants to deal with that?
My friends, our time has arrived.
I received this info from a Avid engineer who saw me doing this and said "we fixed that."
I'm not sure which version the fix came in on, but I am working on Adrenaline v2.7.7
-Select/sift the clips that you want the data duplicated into.
-Hover your cursor over the field you want new data in, right click and select "set COLUMN NAME for selected clips"
-A new dialog box will come up named "Set COLUMN NAME." Enter your text and hit OK.
-Click on on the confimation dialog box and your new data will be entered into the clips you had selected.
Days just became a little shorter.
-Scott
Friday, January 11, 2008
Production Sound
It happens often. You cut to the best performance of a character, and another character steps on the line. Picture departments often will find an alternate reading to "clean up" the area were the overlap of lines happen. However, it is still important that sound editorial has access to the original line reading.
So what you do in these situations is keep the original production in one of your tracks, but bring it down to zero (infinity on the audio mix tool). That way, you get your clean line reading for screenings, but sound has access to the sync track when you turn over your OMFs.
This is a very simple thing to do and will save time down the road.
Thursday, January 10, 2008
Commenting
Information is my friend, so I am always looking at things and trying to find new ways to organize that info or refine existing info.
So, in the AVID, they give you the standard array of columns, which is growing by leaps and bounds, but not always the way I want or need.
Add a few new columns and name them:
Comments_Pix
Comments_Snd
Comments_Mx
Comments_VFX
Comments_DI
Comments_Whatever...
When you export to a codebook, your comments are broken out by category making it really easy to do a search for sound problems and not having to sift thru ancillary comments.
-Scott
Thursday, December 27, 2007
Bin possession
There are times when multiple people might want to open a bin without taking ownership possession of that bin.
As the assistant, I might need to grab a sequence out of a bin, which my editor goes into frequently, but if I have it open and he wants to get into the bin it is locked to him as a user.
The way around it is to hold down the option key on Mac [Alt on PC] while you open the bin from the project window. This will open it for you with a red lock, but it is available for ownership by the other person.
-Scott
Friday, December 14, 2007
Change Lists
The change list tool in the Avid is unmatched by other systems. But because it is, in the end, just a program, it is very important that the picture department makes sure these lists are streamlined and makes sense. The simple truth is that I have heard from numerous sound departments that they get change lists that are unreadable. This should never be the case and can easily be avoided:
1) Know your sequences. And once you have set up your structure for picture and track, be careful not to start moving things around. For example, if you have a green screen in V2 and your background in V1, bring the GS layer down to V1 when making your lists. Just remember to always do this so that you don't get a change list that has you replace your background with your green screen.
2) Make sure the information is correct in the Assemble list boxes. The change list tool has an Assemble List box for both the old and new sequences. Make sure the information in both these areas are the same, and save your settings. For instance, if you check "Show Trans. FX" in the Old List, do so in the New as well.
3) Ignore Color Effects. In the Global settings, make sure you check "Ignore Color Effects." If you do not do this, these pesky effects can show up as changes if you have re-rendered a sequence, even though they are the same clip.
4) Beware of Key Frames. Another thing you want to look at before saving your Change List settings is the Optical area. Make sure you do not have "Key Frames" checked, or you will have trouble making a change list if there is a dissolve on a color effect. Taking this off will save you from some crashes.
5) Take off effects from your sequence. Yes, this is annoying busy work, but quite necessary. Effects on clips, like chroma keys, can get changed themselves without you necessarily change the actual clip. So by going through your sequence before making a list and taking the effects off, you save yourself from having a list that shows unnecessary changes.
6) Reel #. In an earlier post, I listed how the Reel box should be used (especially for doing changes between reels). Just make sure this information is checked in the Old and New areas as well as keeping the reel number consistent in the Reel Heading in your bins.
7) Adding Text. The current Avid Filmscribe gives you the ability to add/change text. Use this to help out the other departments. I will change the headings to make things clear (CL R1 v2 to v3 12/12/07 Picture) as well as bold changes that a editorial department should pay special attention to (like a VFX that causes a sync change internally). And please, put in the new LFOP of your reel in the heading of your Lists (Assemble and Change Lists).
8) Double check the list. Before you send the list out, you need to go through and double check your work. When you look at it, does it make sense? Are there changes present that should not be there?
The big thing is that you keep organized, plan ahead and double check what you send out. Picture Editorial is the gate to the other departments, and it is important that your turnover work is easy to follow and does not contain errors. You would want the same from them, right?
Wednesday, December 5, 2007
VFX Naming
When naming VFX, there is a standard in place within many companies that makes things very smooth for all involved:
1) Make sure when naming shots, always use three numbers (Sc 8o would be 080).
2) Use the scene number to label your VFX shots for easy locating.
3) When naming multiple shots with in a scene, you should label each shot in increments of 10.
1) Make sure when naming shots, always use three numbers (Sc 8o would be 080).
2) Use the scene number to label your VFX shots for easy locating.
3) When naming multiple shots with in a scene, you should label each shot in increments of 10.
- Let's say you have 5 shots in Scene 80, your shots, in sequence order, would be - 080x010, 080x020, 080x030, 080x040, o80x050.
- You spot a new shot in between 080x020 and 080x030...the new shot would be 080x025. Let's say there is one more between 080x025 and 080x030, you could do 080x028...so on and so forth.
Friday, November 30, 2007
Naming conventions for turnover
Generally speaking, I fall into the "more information is better information" column.
Along those lines, I wanted to touch on naming conventions for sequence turnover.
I am a huge fan of using version numbers rather than dates for sequences.
Sure, many people will say that dates make more sense, but there are several reasons why I go with versions over dates.
Versions are absolute. You will never have 2 versions with the same number. You could have 2 or more versions of a sequence on a single date. I know, you have never had that happen.
Versions get incremented at each turnvover. Dates are a secondary check.
All information needed is included: Reel / Version / Date / LFOA / Description.
If you use leading zero's where needed, your data will always lineup nicely in spreadsheets or whatever database you might be using.
The dating convention is based on year/month/day, which lets any program sort the dates correctly.
Picture Quicktime:
1AB_v01_071130_1064+03.mov
Audio GuideTracks:
1AB_v01_071130_1064+03_DIA.aif
1AB_v01_071130_1064+03_SFX.aif
1AB_v01_071130_1064+03_MUS.aif
Audio OMF:
1AB_v01_071130_1064+03_DIA.omf
1AB_v01_071130_1064+03_SFX.omf
1AB_v01_071130_1064+03_MUS.omf
-Scott
Monday, November 26, 2007
Watermarks
Watermarks are a good way of protecting the project you are on from piracy. Basically, when you are creating your property burn-in for your reel, you put the initials of who the sequence is going to in the middle of the frame.
Then in the title tool, highlight the initials (or facility name) and bring the opacity of the titles to about 90percent. Bring the opacity of the shadow to around 88percent. Play with it so it is visible on light scenes, but not too much on dark scenes.

By doing this, your initials/facility name are visible, but the opacity allows the viewer to see through the text. And by having it in the center of picture, there is no way to get rid of the text. Your output is protected.
Wednesday, November 21, 2007
Thursday, November 15, 2007
Saving DVD Files
The Assistants on the show I am working on are doing a real cool trick. After they make a DVD output, they load the DVD onto the editorial computer that has a external hard drive that contains back-ups of all their DVD outputs.
 What they do, is open up the DVD and option-drag the Video_TS folder into a folder on the hard drive with the sequence name and date (make sure this folder does not have spaces).
Then, if you need to make another copy down the road, you open up toast, drag that folder on the back-up drive into the toast window and burn your DVD copy (which is why you want this folder not to have spaces, or the disk will be corrupted). Of course, if you need another burn in (say it is going to another person), you will still need to make another output. But this is a very nice trick to know.
What they do, is open up the DVD and option-drag the Video_TS folder into a folder on the hard drive with the sequence name and date (make sure this folder does not have spaces).Then, if you need to make another copy down the road, you open up toast, drag that folder on the back-up drive into the toast window and burn your DVD copy (which is why you want this folder not to have spaces, or the disk will be corrupted). Of course, if you need another burn in (say it is going to another person), you will still need to make another output. But this is a very nice trick to know.
Wednesday, November 14, 2007
Preview temp tracks
Credit for this tip goes to editor Peter Teschner.
This tip was so perfect that I will be stealing it in the future.
Normally, after a preview temp dub, I would ask for and import LT/RT DME [DIA/MX/FX] tracks to place into our timeline.
One thing that had always bothered me was dealing with cleaning up the BG tracks for subsequent changes with the hard fx built into the tracks. I would just have to spend far more time to make it work.
Peter said that he would bring in a mono dialog track, mono hard FX track, mono BG track and stereo MX tracks. That way you could extend BG's without having to deal with the hard FX being tied.
Depending on the mix and how much spatial work was done, I would consider bringing in LT/RT dialog tracks to maintain the imaging and still be within the 6 track footprint or bring in LT/RT of DIA, BG, Hard FX & MX which would extend out to 8 tracks.
-Scott
OMF media in a MXF project
We just started a project using Adrenaline HD with DNXHD-36.
Based on posts I had seen about issues with MXF audio compatibility, I decided to split the audio off to it's own workspaces, using the OMF/AIFF format instead of MXF. The problem is that if you are in a DNX project, the Avid only refreshes the AVID Mediafiles directories, NOT the OMFI Mediafiles directories, leaving new audio offline. This is a known bug.
The workaround is to create a SD project and switch to that once you have imported/copied your audio files. This will update the OMFI Mediafiles directory, at which point you can switch back to your MXF based project and use your new media.
-Scott
Tuesday, November 13, 2007
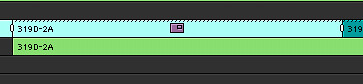
AVID bin sorting
9 or more times out of 10, I find myself wanting a different sort order than what is presented by either telecine TC or clip names, particularly if there are multiple cameras. I.E. if you have English slating, there would be no relevance between slating and actual scenes. If you have multiple cameras and wanted all the Acams, then all the Bcams, or you wanted -1/A then -1/B etc... whatever order you wish.
The answer was to create a custom column called "Sort." Using this column, I just start at 1 and increment the numbers to reflect whatever sort order I am looking for in a particular bin. When you sort the column in ascending order, it places the clips in that order for text view, but more importantly, if you switch to frame view, and select "Bin:Fill sorted" from the menu, it will place the clips in the same sort order you have selected, without any manual shuffling of clips. Further, if for any reason the sort order gets tweaked, you can just select fill again and recreate your selection.
-Scott
Monday, November 12, 2007
Resizes
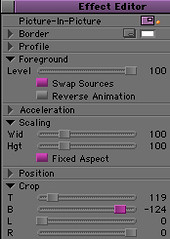
One annoying thing about doing a resize in the Avid is that you lose your mattes. Well, there is a simple trick to get around this. When starting up a show, I make a bin called Avid FX Templates for Avid Fx I use frequently. One of these is a Pic in Pic Effect that is used to keep the mattes of the show.
Take a clip from your show and put on a Picture-In-Picture Effect. Make sure you check Fixed Aspect and set the scaling to 100 percent. Next, check swap sources - the clip should become black. Finally, set the Top and Bottom within Crop until you have only your mattes showing and the picture is black. Click the Pic-In-Pic icon and drag it into your templates bin for future use.
Now, let's say you want to do a resize. Place this Pic-In-Pic template on the clip.
 Match clip your take to put it in the source monitor. Now, step into the effect...this will make it so the take is on V2 and filler is on V1. De-select V2 and spice the footage from the source monitor (using overwrite or replace ) into V1. V1 and V2 has the same footage now. On V1, put on a resize effect and resize accordingly.
 Step back up into your sequence and render. You now have your mattes intact over your resize. Not only does this keep your visual of your burn-ins, but it also shows you what the resize will look like within your aspect ratio.
Friday, November 9, 2007
Garbage in, Garbage out
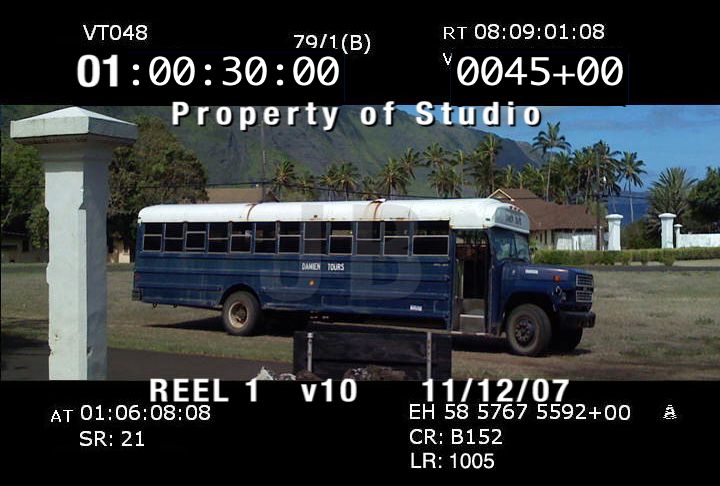
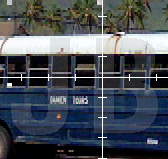
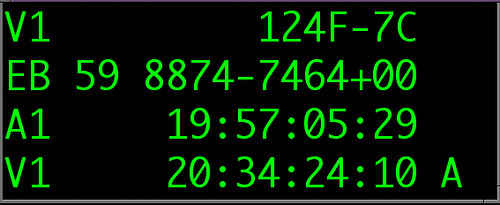
One thing I will always remember from my first introduction to Avid was the term, "Garbage in, garbage out." I would say the most important thing a Picture Department can do to aid the work flow of a project is to double check your data each day during Dailies.
These days, telecine houses can insert numerous burn-ins to your picture/mattes. I like to error on more - Key numbers, tape time code, sound time code, tape #, camera roll, lab roll and sound roll (including MOS). This gives you a great visual aid for each clip.
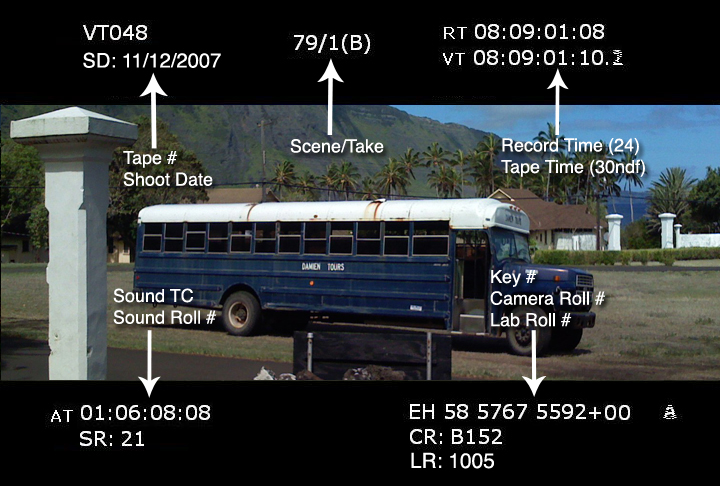
Scott Janush introduced me to a great way to check your key numbers, sound time code, clip name, etc. against the burn ins of your telecine - using the Time Code Window from your tools menu. This handy tool can add any column you wish and as big as you wish.
 During dailies, it is most important that you check this data and sync before you turn over the clips to your editor. Doing so will insure that the footage is perfect and fixed before it becomes part of a sequence. A lot of times, simple errors can be checked and fixed in your bin. However, say you find a key number in your data that does not match the burn. It is important to contact the telecine house and have them check the offending clip. Better safe than sorry.
And it is becoming much more common for sound to be synced up in telcine. It is common for there to be sync issues, so fixing sync is also part of the job. In a 35mm project, you can make a subclip of the out of sync clip and use the slip perfs function to fix sync. This does not work with 16mm, so in that instance you can make a sequence of the clip, fix your sync and then select autosync from the bin menu.
If you spend that extra time checking the work of telecine before editing, you ensure an easy turnover during post-production that you can trust.
Note: There is a limitation in Avid Meridian that makes it so that you cannot check key numbers when using 3perf. This was fixed in Adrenaline.
These days, telecine houses can insert numerous burn-ins to your picture/mattes. I like to error on more - Key numbers, tape time code, sound time code, tape #, camera roll, lab roll and sound roll (including MOS). This gives you a great visual aid for each clip.
Scott Janush introduced me to a great way to check your key numbers, sound time code, clip name, etc. against the burn ins of your telecine - using the Time Code Window from your tools menu. This handy tool can add any column you wish and as big as you wish.
During dailies, it is most important that you check this data and sync before you turn over the clips to your editor. Doing so will insure that the footage is perfect and fixed before it becomes part of a sequence. A lot of times, simple errors can be checked and fixed in your bin. However, say you find a key number in your data that does not match the burn. It is important to contact the telecine house and have them check the offending clip. Better safe than sorry.And it is becoming much more common for sound to be synced up in telcine. It is common for there to be sync issues, so fixing sync is also part of the job. In a 35mm project, you can make a subclip of the out of sync clip and use the slip perfs function to fix sync. This does not work with 16mm, so in that instance you can make a sequence of the clip, fix your sync and then select autosync from the bin menu.
If you spend that extra time checking the work of telecine before editing, you ensure an easy turnover during post-production that you can trust.
Note: There is a limitation in Avid Meridian that makes it so that you cannot check key numbers when using 3perf. This was fixed in Adrenaline.
Wednesday, November 7, 2007
Avid Survey
From Sharon Smith Holley:
Hello All-
Avid is conducting a research survey of content creators worldwide (editors, post supervisors, producers, etc.) – whether you work with Avid products or not. Their goal is to build a deeper understanding of the people who create film and video content, and use that information to design products and programs that truly address your world and your needs. They’ve assured us that no salesperson will call you as a result of completing this survey, and your email address won’t be put on any distribution lists or sold for advertising.
It’s a great opportunity to share your perspectives. See Avid’s request below to get to their online survey.
Thank you!
Avid Survey right here.
Subscribe to:
Posts (Atom)