Generally speaking, I fall into the "more information is better information" column.
Along those lines, I wanted to touch on naming conventions for sequence turnover.
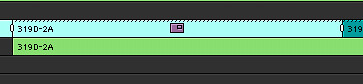
I am a huge fan of using version numbers rather than dates for sequences.
Sure, many people will say that dates make more sense, but there are several reasons why I go with versions over dates.
Versions are absolute. You will never have 2 versions with the same number. You could have 2 or more versions of a sequence on a single date. I know, you have never had that happen.
Versions get incremented at each turnvover. Dates are a secondary check.
All information needed is included: Reel / Version / Date / LFOA / Description.
If you use leading zero's where needed, your data will always lineup nicely in spreadsheets or whatever database you might be using.
The dating convention is based on year/month/day, which lets any program sort the dates correctly.
Picture Quicktime:
1AB_v01_071130_1064+03.mov
Audio GuideTracks:
1AB_v01_071130_1064+03_DIA.aif
1AB_v01_071130_1064+03_SFX.aif
1AB_v01_071130_1064+03_MUS.aif
Audio OMF:
1AB_v01_071130_1064+03_DIA.omf
1AB_v01_071130_1064+03_SFX.omf
1AB_v01_071130_1064+03_MUS.omf
-Scott
Friday, November 30, 2007
Monday, November 26, 2007
Watermarks
Watermarks are a good way of protecting the project you are on from piracy. Basically, when you are creating your property burn-in for your reel, you put the initials of who the sequence is going to in the middle of the frame.
Then in the title tool, highlight the initials (or facility name) and bring the opacity of the titles to about 90percent. Bring the opacity of the shadow to around 88percent. Play with it so it is visible on light scenes, but not too much on dark scenes.

By doing this, your initials/facility name are visible, but the opacity allows the viewer to see through the text. And by having it in the center of picture, there is no way to get rid of the text. Your output is protected.
Wednesday, November 21, 2007
Thursday, November 15, 2007
Saving DVD Files
The Assistants on the show I am working on are doing a real cool trick. After they make a DVD output, they load the DVD onto the editorial computer that has a external hard drive that contains back-ups of all their DVD outputs.
 What they do, is open up the DVD and option-drag the Video_TS folder into a folder on the hard drive with the sequence name and date (make sure this folder does not have spaces).
Then, if you need to make another copy down the road, you open up toast, drag that folder on the back-up drive into the toast window and burn your DVD copy (which is why you want this folder not to have spaces, or the disk will be corrupted). Of course, if you need another burn in (say it is going to another person), you will still need to make another output. But this is a very nice trick to know.
What they do, is open up the DVD and option-drag the Video_TS folder into a folder on the hard drive with the sequence name and date (make sure this folder does not have spaces).Then, if you need to make another copy down the road, you open up toast, drag that folder on the back-up drive into the toast window and burn your DVD copy (which is why you want this folder not to have spaces, or the disk will be corrupted). Of course, if you need another burn in (say it is going to another person), you will still need to make another output. But this is a very nice trick to know.
Wednesday, November 14, 2007
Preview temp tracks
Credit for this tip goes to editor Peter Teschner.
This tip was so perfect that I will be stealing it in the future.
Normally, after a preview temp dub, I would ask for and import LT/RT DME [DIA/MX/FX] tracks to place into our timeline.
One thing that had always bothered me was dealing with cleaning up the BG tracks for subsequent changes with the hard fx built into the tracks. I would just have to spend far more time to make it work.
Peter said that he would bring in a mono dialog track, mono hard FX track, mono BG track and stereo MX tracks. That way you could extend BG's without having to deal with the hard FX being tied.
Depending on the mix and how much spatial work was done, I would consider bringing in LT/RT dialog tracks to maintain the imaging and still be within the 6 track footprint or bring in LT/RT of DIA, BG, Hard FX & MX which would extend out to 8 tracks.
-Scott
OMF media in a MXF project
We just started a project using Adrenaline HD with DNXHD-36.
Based on posts I had seen about issues with MXF audio compatibility, I decided to split the audio off to it's own workspaces, using the OMF/AIFF format instead of MXF. The problem is that if you are in a DNX project, the Avid only refreshes the AVID Mediafiles directories, NOT the OMFI Mediafiles directories, leaving new audio offline. This is a known bug.
The workaround is to create a SD project and switch to that once you have imported/copied your audio files. This will update the OMFI Mediafiles directory, at which point you can switch back to your MXF based project and use your new media.
-Scott
Tuesday, November 13, 2007
AVID bin sorting
9 or more times out of 10, I find myself wanting a different sort order than what is presented by either telecine TC or clip names, particularly if there are multiple cameras. I.E. if you have English slating, there would be no relevance between slating and actual scenes. If you have multiple cameras and wanted all the Acams, then all the Bcams, or you wanted -1/A then -1/B etc... whatever order you wish.
The answer was to create a custom column called "Sort." Using this column, I just start at 1 and increment the numbers to reflect whatever sort order I am looking for in a particular bin. When you sort the column in ascending order, it places the clips in that order for text view, but more importantly, if you switch to frame view, and select "Bin:Fill sorted" from the menu, it will place the clips in the same sort order you have selected, without any manual shuffling of clips. Further, if for any reason the sort order gets tweaked, you can just select fill again and recreate your selection.
-Scott
Monday, November 12, 2007
Resizes
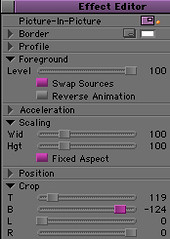
One annoying thing about doing a resize in the Avid is that you lose your mattes. Well, there is a simple trick to get around this. When starting up a show, I make a bin called Avid FX Templates for Avid Fx I use frequently. One of these is a Pic in Pic Effect that is used to keep the mattes of the show.
Take a clip from your show and put on a Picture-In-Picture Effect. Make sure you check Fixed Aspect and set the scaling to 100 percent. Next, check swap sources - the clip should become black. Finally, set the Top and Bottom within Crop until you have only your mattes showing and the picture is black. Click the Pic-In-Pic icon and drag it into your templates bin for future use.
Now, let's say you want to do a resize. Place this Pic-In-Pic template on the clip.
 Match clip your take to put it in the source monitor. Now, step into the effect...this will make it so the take is on V2 and filler is on V1. De-select V2 and spice the footage from the source monitor (using overwrite or replace ) into V1. V1 and V2 has the same footage now. On V1, put on a resize effect and resize accordingly.
 Step back up into your sequence and render. You now have your mattes intact over your resize. Not only does this keep your visual of your burn-ins, but it also shows you what the resize will look like within your aspect ratio.
Friday, November 9, 2007
Garbage in, Garbage out
One thing I will always remember from my first introduction to Avid was the term, "Garbage in, garbage out." I would say the most important thing a Picture Department can do to aid the work flow of a project is to double check your data each day during Dailies.
These days, telecine houses can insert numerous burn-ins to your picture/mattes. I like to error on more - Key numbers, tape time code, sound time code, tape #, camera roll, lab roll and sound roll (including MOS). This gives you a great visual aid for each clip.
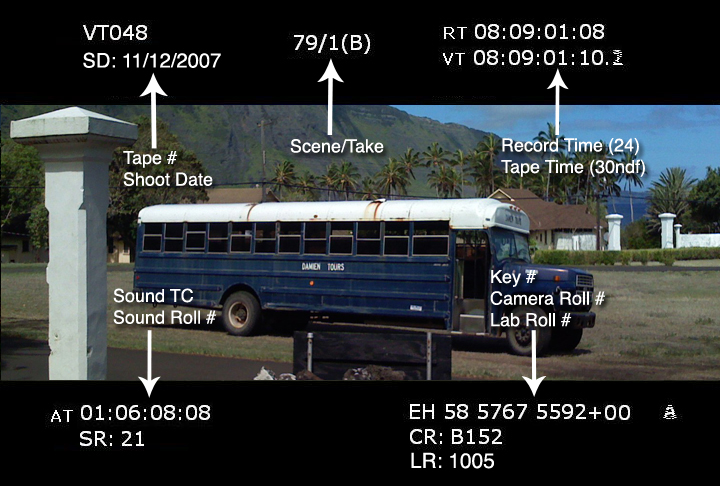
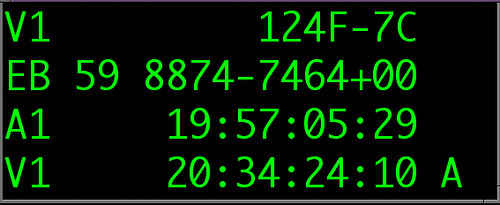
Scott Janush introduced me to a great way to check your key numbers, sound time code, clip name, etc. against the burn ins of your telecine - using the Time Code Window from your tools menu. This handy tool can add any column you wish and as big as you wish.
 During dailies, it is most important that you check this data and sync before you turn over the clips to your editor. Doing so will insure that the footage is perfect and fixed before it becomes part of a sequence. A lot of times, simple errors can be checked and fixed in your bin. However, say you find a key number in your data that does not match the burn. It is important to contact the telecine house and have them check the offending clip. Better safe than sorry.
And it is becoming much more common for sound to be synced up in telcine. It is common for there to be sync issues, so fixing sync is also part of the job. In a 35mm project, you can make a subclip of the out of sync clip and use the slip perfs function to fix sync. This does not work with 16mm, so in that instance you can make a sequence of the clip, fix your sync and then select autosync from the bin menu.
If you spend that extra time checking the work of telecine before editing, you ensure an easy turnover during post-production that you can trust.
Note: There is a limitation in Avid Meridian that makes it so that you cannot check key numbers when using 3perf. This was fixed in Adrenaline.
These days, telecine houses can insert numerous burn-ins to your picture/mattes. I like to error on more - Key numbers, tape time code, sound time code, tape #, camera roll, lab roll and sound roll (including MOS). This gives you a great visual aid for each clip.
Scott Janush introduced me to a great way to check your key numbers, sound time code, clip name, etc. against the burn ins of your telecine - using the Time Code Window from your tools menu. This handy tool can add any column you wish and as big as you wish.
During dailies, it is most important that you check this data and sync before you turn over the clips to your editor. Doing so will insure that the footage is perfect and fixed before it becomes part of a sequence. A lot of times, simple errors can be checked and fixed in your bin. However, say you find a key number in your data that does not match the burn. It is important to contact the telecine house and have them check the offending clip. Better safe than sorry.And it is becoming much more common for sound to be synced up in telcine. It is common for there to be sync issues, so fixing sync is also part of the job. In a 35mm project, you can make a subclip of the out of sync clip and use the slip perfs function to fix sync. This does not work with 16mm, so in that instance you can make a sequence of the clip, fix your sync and then select autosync from the bin menu.
If you spend that extra time checking the work of telecine before editing, you ensure an easy turnover during post-production that you can trust.
Note: There is a limitation in Avid Meridian that makes it so that you cannot check key numbers when using 3perf. This was fixed in Adrenaline.
Wednesday, November 7, 2007
Avid Survey
From Sharon Smith Holley:
Hello All-
Avid is conducting a research survey of content creators worldwide (editors, post supervisors, producers, etc.) – whether you work with Avid products or not. Their goal is to build a deeper understanding of the people who create film and video content, and use that information to design products and programs that truly address your world and your needs. They’ve assured us that no salesperson will call you as a result of completing this survey, and your email address won’t be put on any distribution lists or sold for advertising.
It’s a great opportunity to share your perspectives. See Avid’s request below to get to their online survey.
Thank you!
Avid Survey right here.
Saturday, November 3, 2007
Re-balance Change Lists
Re-balancing reels on a show is always a pain...but a common occurrence in feature films. The first thing you should do as soon as you construct your reels on a show, is to place the reel number in the reel# column in your bin (you can find this in headings in the bin menu). So Reel 4 would have 4 in your reel column. Always make sure you keep doing this as you work on your reels.
Let's say you have a re-balance between reels 3 and 4. Open up film scribe and then bring up the change list tool (command-shift N). Open up your bins that contain the old and new reels 3 and 4. Option drag the old 3 and 4 into the old window. Option drag the new 3 and 4 into the new window. Make sure Reel is checked in your change list tool.
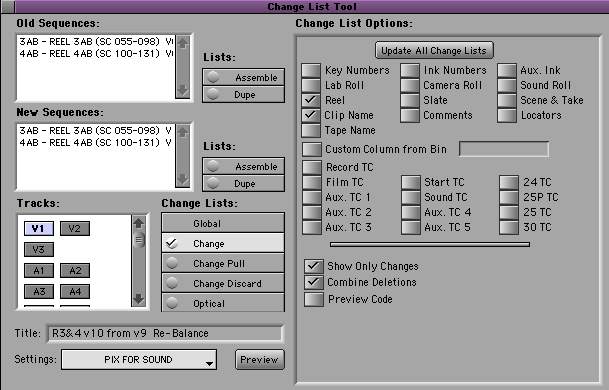
When you make the change list, it will contain two separate lists: One for Reel 3 and the other for Reel 4. And because you have used the Reel # option, the change list will show the movement between these two reels.
Remember, you can edit text in these lists once you have made them. Use that option to clean up the titles of your lists and to add LFOA information in the header of your lists to better help your other editorial departments.
Let's say you have a re-balance between reels 3 and 4. Open up film scribe and then bring up the change list tool (command-shift N). Open up your bins that contain the old and new reels 3 and 4. Option drag the old 3 and 4 into the old window. Option drag the new 3 and 4 into the new window. Make sure Reel is checked in your change list tool.
When you make the change list, it will contain two separate lists: One for Reel 3 and the other for Reel 4. And because you have used the Reel # option, the change list will show the movement between these two reels.
Remember, you can edit text in these lists once you have made them. Use that option to clean up the titles of your lists and to add LFOA information in the header of your lists to better help your other editorial departments.
Identifying Music and Sound Effects
When brining in Sound Effects and Music from your source, it is important that you place all pertinent information into the Clip Name.
For example, say you are bringing in the main title music from American President. Now, Main Title is the name for tracks in many a score, which can be confusing when trying to identify the clip when turning over. So, in the Clip Name, I would label it as follows: American President_Track01_Main Titles. When turning over an OMF to your Music Editor, he/she will immediately be able to see what this track is and where it came from.
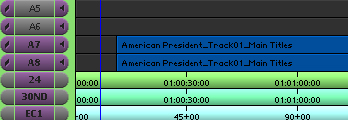
By putting as much information as you can into these clips, you make the turnover process much more manageable.
Friday, November 2, 2007
Feet/Frm & Timecode Burn-In
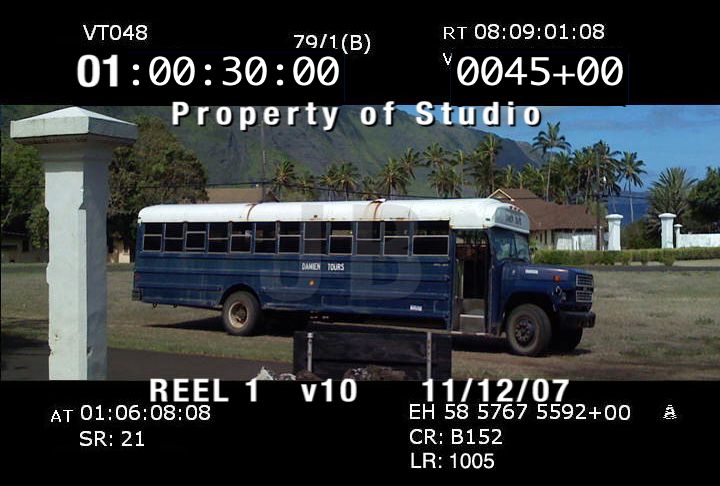
Have telecine layoff a tape with a Blue Screen, Feet & Frame burn-in, Timecode Burn-in.
1) Digitize this tape in to your project from the top of the hour.
2) Create a Property of Title that includes: A number to go over the hour so that you can change this based on reel (ie Reel 4 would be 04); Reel and version; Property of (Studio); Initials (for who you send reel to) in the center of the screen - bring opacity to about 90% of the initials so they become a watermark.
3) Put the Bluescreen and Title(s) in a bin for easy access.
4) When turning over a reel, cut the bluescreen in a new video layer (if your Reel goes up to 2 video layers, you would put this on layer 3).
5) Place a Chroma Key on the Bluescreen (this will make it so just the feet/frm & timecode burn-in appears on your sequence).
6) Place the Property of Title on a video layer ABOVE the bluescreen. Edit the title to give it the appropriate reel#/date/etc. Cut in enough of these titles to cover the entire reel.
7) By place the Title above the bluescreen, you are able to play out your sequence without rendering. However, do an expert render on your sequence to make sure you render any FX in your sequence.
Tip from Melissa Remenarich: Copy the bin and media of these timecode/feet&frame files onto a firewire drive. That way, you can bring them from project to project. You can also do this with your Academy Leaders. Another method would be to export them as QuickTime Movies for future use.
Tape Turnover Layout
Top of the Hour = Reel #. For this, we will use Reel 1 as an example.
1) Stripe your tape starting at 58:00
2) 58:30-59:30 Bars & Tone
3) 58:40-58:50 Slate (Show; In/Out; Track config; etc.)
4) 01:00 - Program Start
5) If you are turning over a Reel, FFOP should start at 01:00:08:00
1) Stripe your tape starting at 58:00
2) 58:30-59:30 Bars & Tone
3) 58:40-58:50 Slate (Show; In/Out; Track config; etc.)
4) 01:00 - Program Start
5) If you are turning over a Reel, FFOP should start at 01:00:08:00
Managing Tracks - Picture Editorial
One of the most important things you can do as a Picture Assistant, is to manage your tracks properly during the first cut and keep to that management. This makes turnover to the other Editing Departments much easier...and better for them as well. Here is a sample of how I do my shows:
COLOR CODE YOUR CLIPS - Color coding SFX, MX, VFX, etc. a specific color in your bin when you bring these clips in, gives you a visual reference in your timeline.
In Timeline Menu, make sure to check Source, Local, and Offline in Clip Color. Make sure Dupe Detection is checked.
To change color of a clip in a bin, select the clip(s) and then choose a color from "clip color" in the Edit Menu.
To change color of a clip within the timeline, highlight the clip with the red sequence arrow (at the bottom of the timeline screen), and select clip color from the Edit Menu.
Blue = TRK - MUSIC
Yellow = TRK - SOUND FX
Orange = QUICK TIME / MIC SOUND
Cyan = PIX - DAILIES TB VFX
Green = PIX - TEMP VFX
Rose = PIX - CAMERA PROBLEM
Red = MEDIA OFFLINE (Don’t use this color for anything else)
ORGANIZE YOUR TRACKS - Setting up a standard of what goes on which tracks in picture editorial keeps things organized for both yourself and other departments.
AUDIO TRACKS 1->3 = PRODUCTION (DIA, WT, ETC)
AUDIO TRACK 4->6= MONO SFX
AUDIO TRACKS 7->8 = STEREO MX
Use Direct Out (located in Audio tool). For Tracks 1->6, have mixer pans at center. For Track 7, have mixer paned left. For Track 8, have mixer panned right. Then use your audio tool to play out -20db Tone and set each track on your Mixer Board to 0.
Subscribe to:
Posts (Atom)